Setup
If you want to use Cloudflare as your primary DNS provider and manage your DNS records on Cloudflare, your domain should be using a full setup.
This means that you are using Cloudflare for your authoritative DNS nameservers.
Before you update your domain nameservers, make sure that you:
- Already own a domain name (such as
example.comorcloudflare.com).
- Have previously created a Cloudflare account.
- Disabled DNSSEC at your registrar (where you bought your domain name).
Provider-specific instructions
This is not an exhaustive list of how to update DS records in other providers, but the following links may be helpful:
In the Cloudflare dashboard, add your domain.
If Cloudflare is unable to identify your domain as a registered domain, make sure you are using an existing top-level domain ↗ (.com, .net, .biz, or others).
Cloudflare requires your apex domain to be one level below a valid TLD defined in the Public Suffix List (PSL) ↗. Enterprise customers can onboard lower-level subdomains using Subdomain setup.
When you start using Cloudflare's nameservers for authoritative DNS and your zone is in a full setup, Cloudflare will become your primary DNS provider. This means that your DNS records in Cloudflare need to be accurate for your domain to work properly.
Cloudflare can automatically scan for common records and add them to the DNS zone for you, or you can add records manually. These records show up under your domain on the DNS > Records page of the dashboard.
Since the quick scan is not guaranteed to find all existing DNS records, you need to review your records, paying special attention to the following:
-
Zone apex records (
example.com)More about zone apex records
Zone apex refers to the domain or subdomain that you are adding to Cloudflare.
Usually, the zone apex record makes your domain accessible by visitors. In this case, the necessary record type (A, AAAA, or CNAME) and its content will depend on the provider that hosts your website or application.
If you are using Cloudflare Pages, refer to Custom domains.
If you are using other providers, look for their guidance on how to connect domains managed on external DNS services. Then, make sure you have the records required by your hosting provider on your DNS records table at Cloudflare.
-
Subdomain records (
www.example.comorblog.example.com)More about subdomain records
Most subdomains serve a specific purpose within the overall context of your website. For example,
blog.example.commight be your blog,support.example.comcould be your customer help portal, andstore.example.comwould be your e-commerce site.Even if you do not require specific subdomains, you might want to set up at least the
wwwsubdomain. It will usually point to the same content as what you have on the apex domain (example.com) or use a redirect. Having a DNS record on thewwwsubdomain helps guarantee that a visitor who typeswww.in front of your domain address on their browser can still find your website or application. -
More about email records
Depending on your business needs, you can configure DNS records so that you can use your domain to receive emails, receive and send emails from your domain, or prevent others from sending emails on your behalf (spoofing).
Below are some examples of what those DNS records might look like. The exact values for your DNS mail records depend on your email provider. If you have issues, review the Troubleshooting and contact your email service provider to confirm your DNS records are correct.
Type Name Content Proxy status TTL A mail192.0.2.1DNS Only Auto MX example.com5 john.mx.example-server.testDNS Only Auto TXT _dmarc"v=DMARC1; p=reject; sp=...DNS Only Auto TXT *._domainkey"v=DKIM1; k=rsa; p=..."DNS Only Auto TXT example.com"v=spf1 ip4:..."DNS Only Auto
Once you have added a domain (also known as a zone) to Cloudflare, that domain will receive two assigned authoritative nameservers.
-
Log in to the Cloudflare dashboard ↗ and select your account and domain.
-
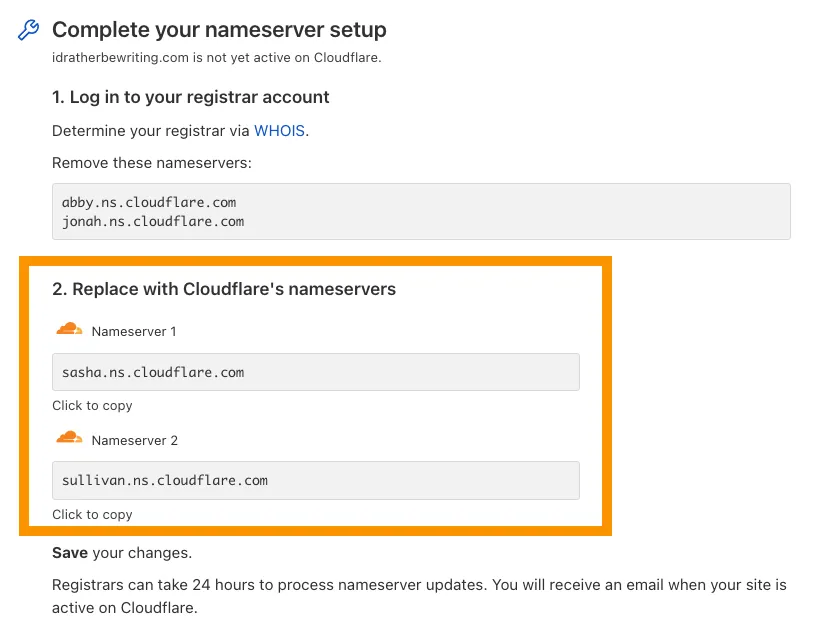
On Overview, locate the nameserver names in 2. Replace with Cloudflare's nameservers.

- Keep this window open while you perform the next step.
- Log in to the admin account for your domain registrar. If you do not know your provider, use ICANN Lookup ↗.
-
Remove your existing authoritative nameservers.
-
Add the nameservers provided by Cloudflare. If their names are not copied exactly, your DNS will not resolve correctly.
Provider-specific instructions
This is not an exhaustive list of provider-specific instructions, but the following links may be helpful:
- Ionos ↗
- 101Domain ↗
- Amazon ↗
- Blacknight ↗
- BlueHost ↗
- DirectNIC ↗
- DNSMadeEasy ↗
- Domain.com ↗
- Dotster ↗
- DreamHost ↗
- EasyDNS ↗
- Enom ↗
- Fast Domain ↗
- FlokiNET ↗
- Gandi ↗
- GoDaddy ↗
- HostGator ↗
- Hostico ↗
- HostMonster ↗
- Hover ↗
- Internetdbs ↗
- iPage ↗
- MelbourneIT ↗
- Moniker ↗
- Name.com ↗
- Namecheap ↗
- Network Solutions ↗
- OVH ↗
- Porkbun ↗
- Rackspace ↗
- Register ↗
- Squarespace ↗
- Site5 ↗
- Softlayer ↗
- Yola ↗
Wait up to 24 hours while your registrar updates your nameservers.
When your domain is Active:
- You will receive an email from Cloudflare.
- Your domain will have a status of Active on the Websites page of your account.
- Online tools such as https://www.whatsmydns.net/ ↗ will show your Cloudflare-assigned nameservers (most of these tools use cached query results, so it may take longer for them to show the updated nameservers).
- CLI commands will show your Cloudflare-assigned nameservers
*Linux/Unix*dig <DOMAIN_NAME> +trace @1.1.1.1dig <DOMAIN_NAME> +trace @8.8.8.8
*Windows*nslookup <DOMAIN_NAME> 1.1.1.1nslookup <DOMAIN_NAME> 8.8.8.8When you updated your nameservers, you should have also disabled DNSSEC at your registrar.
You should now enable DNSSEC to protect from domain spoofing.