Send SSO attributes to Access-protected origins with Workers
This tutorial will walk you through extending the single-sign-on (SSO) capabilities of Cloudflare Access with our serverless computing platform, Cloudflare Workers. Specifically, this guide will demonstrate how to modify requests sent to your secured origin to include additional information from the Cloudflare Access authentication event.
Time to complete: 45 minutes
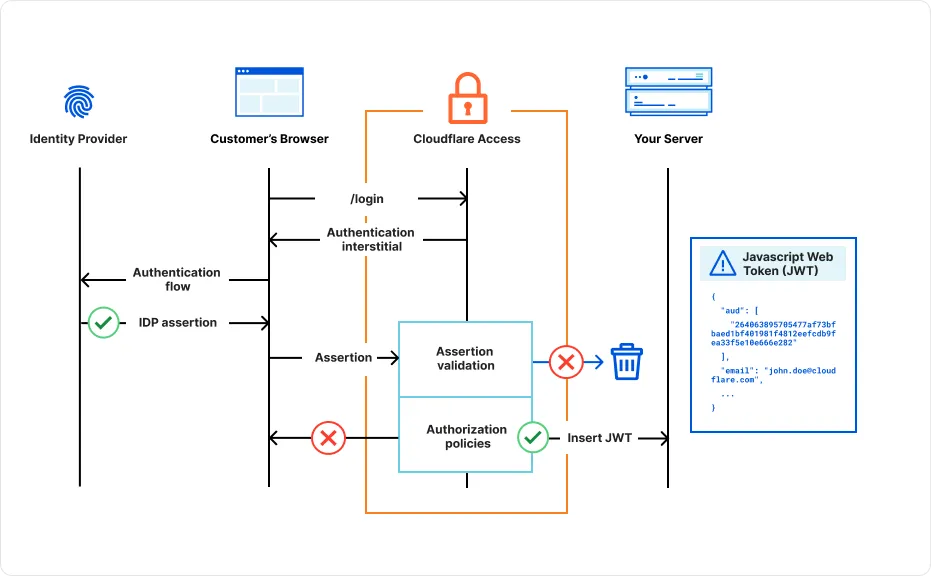
Cloudflare Access is an authentication proxy in charge of validating a user's identity before they connect to your application. As shown in the diagram below, Access inserts a JWT into the request, which can then be verified by the origin server.

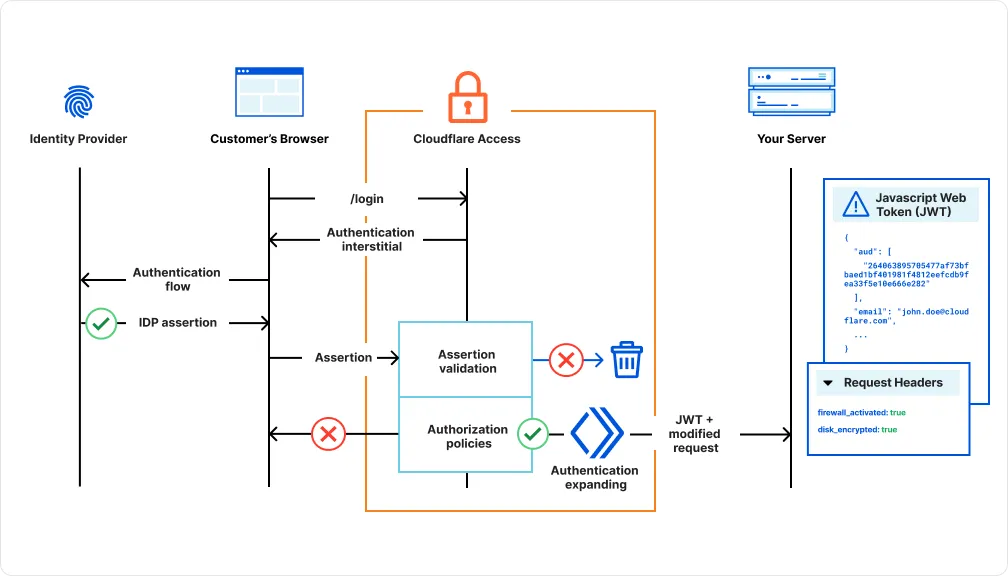
You can extend this functionality by using a Cloudflare Worker to insert additional HTTP headers into the request. In this example, we will add the device posture attributes firewall_activated and disk_encrypted, but you can include any attributes that Cloudflare Access collects from the authentication event.

This approach allows you to:
- Enhance security: By incorporating additional information from the authentication event, you can implement more robust security measures. For example, you can use device posture data to enforce access based on device compliance.
- Improve user experience: You can personalize the user experience by tailoring content or functionality based on user attributes. For example, you can display different content based on the user's role or location.
- Simplify development: By using Cloudflare Workers, you can easily extend your Cloudflare Access configuration without modifying your origin application code.
- Add a self-hosted application to Cloudflare Access.
- Enable the Disk encryption and Firewall device posture checks.
- Install Wrangler on your local machine.
-
Create a new Workers project:
Terminal window npm create cloudflare@latest -- device-posture-workerTerminal window pnpm create cloudflare@latest device-posture-workerTerminal window yarn create cloudflare@latest device-posture-workerFor setup, select the following options:
- For What would you like to start with?, choose
Hello World example. - For Which template would you like to use?, choose
Hello World Worker. - For Which language do you want to use?, choose
JavaScript. - For Do you want to use git for version control?, choose
Yes. - For Do you want to deploy your application?, choose
No(we will be making some changes before deploying).
- For What would you like to start with?, choose
-
Change to the project directory:
Terminal window $ cd device-posture-worker -
Copy-paste the following code into
src/index.js. Be sure to replace<your-team-name>with your Zero Trust team name.index.js import { parse } from "cookie";export default {async fetch(request, env, ctx) {// The name of the cookieconst COOKIE_NAME = "CF_Authorization";const CF_GET_IDENTITY = "https://<your-team-name>.cloudflareaccess.com>/cdn-cgi/access/get-identity";const cookie = parse(request.headers.get("Cookie") || "");if (cookie[COOKIE_NAME] != null) {try {let id = await (await fetch(CF_GET_IDENTITY, request)).json()let diskEncryptionStatus = false;let firewallStatus = false;for (const checkId in id.devicePosture) {const check = id.devicePosture[checkId];if (check.type === "disk_encryption") {console.log(check.type)diskEncryptionStatus = check.success;}if (check.type === "firewall") {console.log(check.type)firewallStatus = check.success;break;}}//clone request (immutable otherwise) and insert posture values in new header setlet newRequest = await new Request(request)newRequest.headers.set("Cf-Access-Firewall-Activated", firewallStatus)newRequest.headers.set("Cf-Access-Disk-Encrypted", firewallStatus)//sent modified request to originreturn await fetch(newRequest)} catch (e) {console.log(e)return await fetch(request)}}return await fetch(request)},};
The script in index.js uses the get-identity endpoint to fetch a user's complete identity from a Cloudflare Access authentication event. To view a list of available data fields, log in to your Access application and append /cdn-cgi/access/get-identity to the URL. For example, if www.example.com is behind Access, go to https://www.example.com/cdn-cgi/access/get-identity.
Below is an example of a user identity that includes the disk_encryption and firewall posture checks. The Worker inserts the posture check results into the request headers Cf-Access-Firewall-Activated and Cf-Access-Disk-Encrypted.
{ "id": "P51Tuu01fWHMBjIBvrCK1lK-eUDWs2aQMv03WDqT5oY", "name": "John Doe", "email": "john.doe@cloudflare.com", "amr": [ "pwd" ], "oidc_fields": { "principalName": "XXXXXX_cloudflare.com#EXT#@XXXXXXcloudflare.onmicrosoft.com" }, "groups": [ { "id": "fdaedb59-e9be-4ab7-8001-3e069da54185", "name": "XXXXX" } ], "idp": { "id": "b9f4d68e-dac1-48b0-b728-ae05a5f0d4b2", "type": "azureAD" }, "geo": { "country": "FR" }, "user_uuid": "ce40d564-c72f-475f-a9b8-f395f19ad986", "account_id": "121287a0c6e6260ec930655e6b39a3a8", "iat": 1724056537, "devicePosture": { "f6f9391e-6776-4878-9c60-0cc807dc7dc8": { "id": "f6f9391e-6776-4878-9c60-0cc807dc7dc8", "schedule": "5m", "timestamp": "2024-08-19T08:31:59.274Z", "description": "", "type": "disk_encryption", "check": { "drives": { "C": { "encrypted": true } } }, "success": false, "rule_name": "Disk Encryption - Windows", "input": { "requireAll": true, "checkDisks": [] }, "a0a8e83d-be75-4aa6-bfa0-5791da6e9186": { "id": "a0a8e83d-be75-4aa6-bfa0-5791da6e9186", "schedule": "5m", "timestamp": "2024-08-19T08:31:59.274Z", "description": "", "type": "firewall", "check": { "firewall": false }, "success": false, "rule_name": "Local Firewall Check - Windows", "input": { "enabled": true } } ... }In the wrangler.toml / wrangler.json file, set up a route that maps the Worker to your Access application domain:
{ "route": { "pattern": "app.example.com/*", "zone_name": "example.com" }}route = { pattern= "app.example.com/*", zone_name="example.com"}npx wrangler deployThe Worker will now insert the Cf-Access-Firewall-Activated and Cf-Access-Disk-Encrypted headers into requests that pass your application's Access policies.
{ "headers": { "Accept": "text/html,application/xhtml+xml,application/xml;q=0.9,image/avif,image/webp,image/apng,*/*;q=0.8,application/signed-exchange;v=b3;q=0.7", "Accept-Encoding": "gzip", "Accept-Language": "en-US,en;q=0.9,fr-FR;q=0.8,fr;q=0.7,en-GB;q=0.6", "Cf-Access-Authenticated-User-Email": "John.Doe@cloudflare.com", "Cf-Access-Disk-Encrypted": "false", "Cf-Access-Firewall-Activated": "false", "User-Agent": "Mozilla/5.0 (Macintosh; Intel Mac OS X 10_15_7) AppleWebKit/537.36 (KHTML, like Gecko) Chrome/127.0.0.0 Safari/537.36" }}You can verify that these headers are received by the origin server.